Choosing the Best RV Roof Sealant for Durable, Waterproof, and UV Protected Options
Why Your RV Roof Seal Matters More Than You Think
RV roof seal maintenance is critical for protecting your investment from water damage, which can cost thousands to repair. Here’s what you need to know:
Quick Answer: What is RV Roof Seal?
- Purpose: Creates a waterproof barrier on your RV roof to prevent leaks and water damage
- Types: Liquid sealants (for edges and vents), sealant tape (for seams and tears), and full roof coatings (for entire roof protection)
- Best For: EPDM roofs use Dicor lap sealant, fiberglass roofs use ProFlex RV sealant, aluminum roofs use Sikasil
- Maintenance: Inspect every 6 months, reseal every 2-4 years depending on climate
- Cost: DIY repairs cost $20-$550 vs. professional replacement at $2,500-$10,000
Your RV roof faces constant assault from UV rays, extreme temperatures, rain, and debris. Without proper sealing, water finds its way through the smallest cracks around vents, skylights, and seams. Once inside, moisture causes mold growth, wood rot, delamination, and electrical damage that can destroy your RV’s interior.
A small leak ignored today becomes a $5,000 repair tomorrow. The original roof sealant from manufacturers typically lasts 10-20 years with proper maintenance, but harsh weather can accelerate deterioration. Regular inspection and resealing are your best defense against catastrophic water damage.
I’m Byron Tarlton, founder of Road Rescue Network, and through our nationwide network of mobile mechanics and roadside service providers, I’ve seen countless RV owners face preventable water damage from neglected RV roof seals. This guide will help you choose the right sealant, apply it correctly, and maintain your roof for maximum protection.
 Sealant failure from age and weathering (40%), 2) Physical damage from branches and hail (35%), 3) UV degradation breaking down roof materials (25%) - RV roof seal infographic")
RV roof seal vocab explained:
Understanding Your RV Roof and Spotting Trouble

Before we dive into sealants, it’s crucial to understand what type of RV roof you have and how to spot the early warning signs of trouble. Regular inspection is your first line of defense against costly damage.
Common RV Roof Materials
The material of your RV roof is the primary factor in determining the best sealant choice. While most modern RVs feature rubber roofs, older models might have metal or fiberglass. Here’s a quick rundown of common types:
- EPDM (Ethylene Propylene Diene Monomer) Rubber: This is a very common, generally durable, lightweight, and inexpensive rubber roofing material. It’s often white to reflect sunlight.
- TPO (Thermoplastic Polyolefin) Rubber: Another popular rubber roof choice, TPO is often more resistant to tears and punctures than EPDM. It’s also lightweight and durable. PVC roofs are also known for being more resistant to scratches, tears, and UV degradation.
- Fiberglass: Found on many higher-end RVs, fiberglass roofs are known for their durability and require less maintenance. They are heavier and moderately expensive but can last 10-20 years.
- Aluminum: Very durable and long-lasting (15-30 years), aluminum roofs require less maintenance and don’t streak as much due to decreased dirt retention. However, they can be more expensive. If metal is part of the roofing structure, water damage can quickly lead to corrosion.
- Acrylic: Lightweight and inexpensive, acrylic roofs offer moderate durability.
It’s always best to consult your RV’s owner’s manual or contact the manufacturer to confirm your specific roof material. This information will be invaluable when selecting the right sealant.
Signs of a Damaged or Leaking RV Roof
Ignoring minor issues can lead to significant problems, so knowing what to look for is essential. We recommend inspecting your RV roof every six months, and especially after any severe weather events.
Here are the key signs of a damaged or leaking RV roof:
- Cracked or Peeling Sealant: This is perhaps the most obvious sign. Over time, UV exposure and temperature fluctuations will cause existing sealants around vents, skylights, and seams to crack, become brittle, or peel away.
- Bubbles or Delamination in the Membrane: If you have a rubber roof, you might notice bubbles forming under the membrane or areas where the membrane is lifting or separating from the roof decking.
- Soft Spots on the Roof: While walking on your RV roof (if it’s walkable), pay attention to any soft or spongy areas. This indicates water has penetrated the roof and is damaging the underlying wood or substrate.
- Interior Water Stains: Discolored streaks, yellowing, or dark spots on your RV’s ceiling, walls, or even window frames are clear indicators of water intrusion.
- Musty Odors or Mold Growth: A persistent musty smell inside your RV often points to mildew or mold. Black mold, in particular, can cause health issues for people and pets and may require professional remediation.
- Peeling or Wrinkled Wallpaper/Interior Panels: Water seeping into the walls can cause interior finishes to peel, wrinkle, or delaminate.
- Corrosion on Metal Parts: If your RV has metal components on the roof (like AC units or vents), check for rust, discoloration, or flaking. This can be a sign of water exposure.
- Uneven Temperatures or Drafts: If you notice cold spots or drafts inside your RV, even with windows closed, it could indicate hidden cracks or holes in the roof that are compromising your insulation.
Catching these signs early means you can address them with a simple repair, saving you from a much larger, more expensive headache down the road.
Sealant vs. Coating vs. Tape: What’s the Difference?
When it comes to protecting your RV roof, you’ll encounter various products designed for different purposes. Understanding the distinction between liquid sealants, sealant tapes, and full roof coatings is key to choosing the right solution for your specific needs.
| Product Type | Use Case | Skill Level | Cost (DIY) |
|---|---|---|---|
| Liquid Sealant | Spot repairs, resealing edges, vents, skylights, AC units | Beginner-Intermediate | $20-$50 per tube |
| Sealant Tape | Emergency repairs, seam sealing, patching tears, quick fixes | Beginner | $30-$100 per roll |
| Full Roof Coating | Resealing entire roof, preventative maintenance, extending roof life | Intermediate-Advanced | $500-$600 per kit |
When to Use a Liquid RV Roof Sealant
Liquid RV roof sealants are your go-to for targeted repairs and maintaining specific areas. As Camping World aptly puts it, a sealant is “used to reseal roof edges or patch smaller damaged or worn areas of your RV’s roof membrane.”
These are ideal for:
- Spot Repairs: Addressing small cracks, pinholes, or worn areas.
- Sealing Edges and Penetrations: Crucial for areas around roof vents, skylights, air conditioners, antennas, and vent pipes where water is most likely to intrude.
- Caulking Gun Application: Most come in tubes and are applied with a standard caulking gun, making them relatively easy for DIYers.
You’ll typically find two main types of liquid sealants:
- Self-Leveling Sealants: These are designed for horizontal surfaces. Once applied, they flow slightly to create a smooth, even, and watertight seal without needing much manual smoothing. Dicor Self-Leveling Lap Sealant is a popular example, known for being UV-stabilized and HAPS-free (hazardous air pollutants).
- Non-Sag (or Non-Leveling) Sealants: These are thicker and designed for vertical surfaces or areas where you don’t want the sealant to run, such as around the sidewalls or the sides of roof-mounted accessories. Geocel ProFlex RV™ Sealant is a clear, non-sag option that can even be painted over.
When to Use Sealant Tape
Sealant tape offers a quick and effective solution for specific repair scenarios, particularly for seams and tears.
- Emergency Repairs: If you find a sudden leak or tear, sealant tape can provide an immediate, temporary, or even long-term fix.
- Seam Sealing: Ideal for reinforcing or repairing seams on your RV roof.
- Patching Tears: Larger tears or punctures in the roof membrane can be effectively covered and sealed with tape.
- Ease of Use: Many tapes are peel-and-stick, making them very user-friendly for quick fixes. Products like Quick Roof Extreme Repair Tape and Dicor Seal-Tite Sealing Tape are excellent examples.
When using tape, ensure the surface is carefully clean and dry for optimal adhesion. You’ll often need to press it firmly into place, working out any air bubbles. Some tapes, like Gardner RV Roof Seam Tape, even require a top coat of a liquid sealant or coating for complete sealing.
When to Choose a Full Roof Coating
A full roof coating is a more comprehensive solution, often chosen for preventative maintenance or when an entire RV roof needs resealing. This is different from a sealant, which focuses on localized areas. A coating is used to seal (or reseal) an entire RV roof, providing a new protective layer.
- Resealing an Entire Roof: If your existing roof membrane is showing widespread wear, fading, or minor cracking but is still structurally sound, a full coating can refresh it.
- Preventative Maintenance: Applying a coating can significantly extend the life of your RV roof by adding an extra layer of protection against the elements.
- UV Reflection and Cooling: Many coatings, especially elastomeric white roof coatings, are designed to reflect heat and harmful UV rays, which can help lower cooling costs inside your RV. Kool Seal RV™ Premium 5 Year Elastomeric White Roof Coating is a good example, boasting a 5-year warranty and superior UV resistance.
- Extending Roof Life: A high-quality coating can add years to your RV roof’s lifespan, postponing the need for a costly replacement.
Look for coatings that are elastomeric, meaning they are flexible and can expand and contract with temperature changes. Silicone coatings are also popular for their durability and waterproofing. Products like Liquid Rubber RV Roof Coating are polyurethane-based, robust, flexible, and often VOC-free, offering long-term protection. Dicor also offers rubber roof coating systems for EPDM, TPO, and PVC membranes, and specific fiberglass RV roof coatings.
The Ultimate Guide to Applying an RV Roof Seal
Applying an RV roof seal isn’t just about slathering on a product; it’s a systematic process that, when done correctly, ensures maximum protection and longevity for your RV. Let’s break it down.

Step 1: Preparing the Roof for Sealing
Preparation is perhaps the most critical step. A clean, dry, and properly prepped surface ensures optimal adhesion and effectiveness of your sealant or coating.
- Thorough Cleaning: Start by cleaning the entire RV roof with soap and water. Remove all dirt, grime, leaves, and any mildew. You can use a soft-bristle brush or sponge. For stubborn stains, a specialized RV roof cleaner might be necessary.
- Rinse Thoroughly: Rinse the roof completely to remove all soap residue.
- Ensure a Dry Surface: This is paramount. The roof must be completely dry before applying any sealant or coating. Allow several hours, or even a full day, for it to air dry, especially if the weather is humid.
- Remove Old, Damaged Sealant: Carefully scrape away any old, cracked, peeling, or loose sealant. A plastic or metal scraper can be used, but be gentle to avoid damaging the roof membrane. For stubborn areas, applying a little heat (like from a hairdryer on a warm day) can soften the old sealant, making it easier to remove.
- Clean Residue: After scraping, clean the area with mineral spirits or a product recommended by your sealant manufacturer to remove any remaining residue or oils. For TPO/EPDM, rags and acetone can be used for cleaning. For PVC/Plastic, light sanding or scouring might be needed to remove chalking. For metal, ensure all rust is removed with a wire brush.
Any contaminants left on the surface can compromise the new seal’s adhesion.
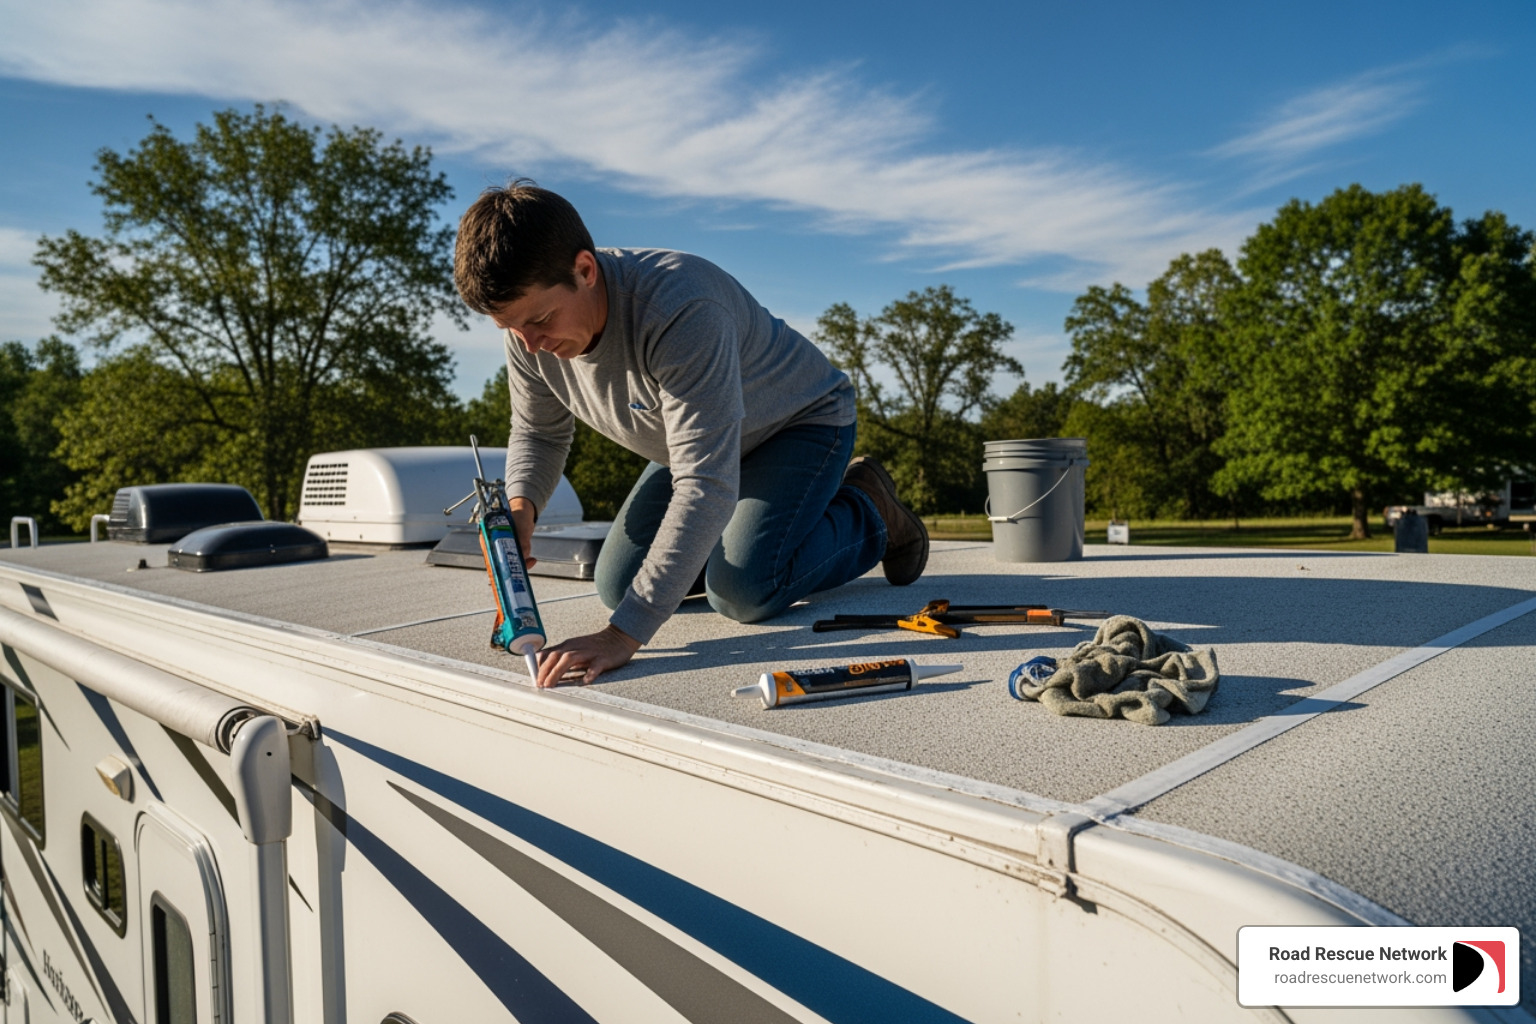
Step 2: The Application Process for Your RV Roof Seal
Once your roof is pristine and dry, it’s time for application. The technique will vary slightly depending on the product and roof material.
Best Sealants for Each Roof Type (and Application Tips):
- For EPDM and TPO Rubber Roofs:
- Sealant: Dicor Self Leveling Lap Sealant is a top choice. It’s UV-stabilized and compatible with most single-ply membranes.
- Coating: Dicor’s rubber roof coating system works on EPDM, TPO, and PVC membranes. For an 8’ x 30’ RV roof, you might need about four gallons for a complete reseal, as Dicor recommends two coats at a coverage rate of one gallon per 125 square feet. Liquid Rubber RV Roof Coating is also an excellent polyurethane-based, VOC-free option.
- Application: Apply liquid sealants with a caulking gun, holding it at a 45-degree angle. Apply a consistent bead along all seams, around vents, and other roof penetrations. Smooth the bead with a finger or smoothing tool if desired.
- For Fiberglass Roofs:
- Sealant: Geocel ProFlex RV™ Sealant, Clear, is highly recommended for its adhesion and elasticity on fiberglass. It displaces water as it’s applied, aiding a watertight seal.
- Coating: Dicor Fiberglass RV Roof Coating is specifically designed for fiberglass. One gallon covers approximately 350 square feet, and a minimum of two coats is recommended.
- Application: Similar to rubber roofs, use a caulking gun for sealants. For coatings, use a paint roller or brush for even application.
- For Aluminum Roofs:
- Sealant: AP Product Sikasil is used in RV production for its improved adhesion, fast curing, and long service life on aluminum.
- Coating: Dicor’s metal roof RV coating is an elastomeric coating that forms a rubber barrier on any metal, aluminum, steel, or previously coated RV roof. You must apply Coating-Ready Cover Tape to the roof’s surface before using this metal coating.
- Application: Apply sealants with a caulking gun. For coatings, ensure proper surface preparation and tape application as specified by the manufacturer.
General Application Tips:
- Work in Sections: Especially with coatings or fast-setting sealants, work in manageable sections to ensure even application and avoid missing spots.
- Don’t Stretch Tape: If using sealant tape, don’t stretch it during installation. Lay it out and press it firmly. If it folds or puckers, cut out the bad section and overlap, or apply self-leveling sealant along the edges.
- Multiple Coats for Coatings: For full roof coatings, always apply a minimum of two coats for optimal performance and durability. Allow the first coat to dry completely before applying the second.
Step 3: Best Practices for a Lasting RV Roof Seal
To ensure your newly applied RV roof seal lasts as long as possible, follow these best practices:
- Weather Considerations:
- Ideal Temperature: Apply sealants and coatings when temperatures are moderate, typically between 50°F and 90°F. Avoid extreme heat or cold. For instance, Gardner RV Roof Seam Tape has an application temperature range of -30°F to 200°F, but for temperatures below 40°F, a primer is recommended.
- Low Humidity: High humidity can affect curing times. Choose a day with low humidity for application.
- Dry Conditions: Ensure no rain is expected for at least 24-48 hours after application. Many sealants require this time to fully cure and become waterproof. For example, Kool Seal recommends 4-6 hours before exposure to rain, and 24 hours between coats. Liquid Rubber advises checking the forecast for a dry period, as it can take up to 48 hours to set and cure.
- Curing Time: Respect the manufacturer’s recommended curing time. This is the period during which the sealant or coating hardens and achieves its full strength. Avoid walking on the roof or exposing it to harsh conditions during this time.
- Avoid Petroleum Products on Rubber Roofs: This is a crucial warning from Loctite: “Do not use petroleum-based products on rubber roofs because they cause serious, irreparable damage.” Always use products specifically labeled as safe for your RV roof material.
- Apply Multiple Coats for Coatings: As mentioned, for full roof coatings, two coats are almost always recommended for optimal protection and coverage.
Maintenance, Lifespan, and Costs
Maintaining your RV roof seal is an ongoing commitment, but it’s one that pays dividends in protecting your investment. Proactive maintenance is always cheaper than reactive repairs.
How Often to Inspect and Reseal
- Annual Inspection: We recommend a thorough inspection of your RV roof at least once a year. Some experts, like those at Loctite, suggest every few years, or even once every 1-2 years in harsh climates. The Liquid Rubber guide recommends inspecting every six months, especially after large storms or heavy snow.
- Semi-Annual Checks: For RVs that see heavy use or are exposed to extreme weather (like intense sun in Arizona or heavy snow in Colorado), a semi-annual check might be more appropriate.
- Resealing Frequency: While the original roof sealant from the manufacturer is rated to last 10 to 20 years with proper maintenance, recoating the seal is ideally done every two to four years, depending on your weather and environment. This proactive approach helps prevent leaks before they start.
DIY vs. Professional Costs
The cost of maintaining your RV roof can vary significantly depending on whether you tackle the job yourself or hire a professional, and whether you’re repairing a small leak or replacing an entire roof.
- DIY Repair Costs:
- For spot repairs, a single 10.3-ounce tube of RV roof sealant can cost around $20-$50.
- A gallon of Liquid Rubber RV Roof Coating is priced at $79.95.
- A full DIY kit for Liquid Rubber RV Roof Coating, which can cover up to a 30’ RV, costs approximately $549.75. This is a significant saving compared to professional replacement.
- Professional Repair/Replacement Costs:
- A small RV roof replacement can cost between $2,500 and $5,000.
- A larger RV roof replacement can range from $5,000 to $10,000.
- Professional labor costs for replacement can add another $1,000 to $2,500 to the total.
- Total professional RV roof replacement costs can range from $2,805.77 to $4,805.77, according to Liquid Rubber’s cost comparison.
- Cost of Neglect: Ignoring minor roof damage can lead to exorbitant costs:
- Professional mold and mildew remediation can average $1,000 to $10,000.
- Replacing damaged insulation can average $500 to $1,000+.
- Interior water damage, including peeling wallpaper, can quickly escalate repair expenses.
- Corrosion on metal parts can lead to structural compromise.
As you can see, investing a few hundred dollars and some time into DIY sealing can prevent thousands of dollars in professional repair or replacement costs. Proactive maintenance truly saves you money and headaches in the long run.
Frequently Asked Questions about RV Roof Sealing
We’ve covered a lot, but some common questions often pop up when RV owners are tackling roof maintenance. Let’s address them.
Can I use Flex Seal or automotive sealants on my RV roof?
This is a frequent question, and the answer is generally no, with a strong caution for emergencies.
- Flex Seal: While Flex Seal might seem like a quick fix, it’s typically not recommended for long-term RV roof seal solutions. According to Camping World, its lack of UV stabilization can cause it to crack and fail when exposed to the sun. Additionally, Flex Seal’s silicone products can leave a residue that makes it difficult for future, more appropriate sealants to adhere properly. Use it only in an emergency, and plan for a proper repair as soon as possible.
- Automotive Weather Stripping or Sealants: Automotive products like those used for car windows or windshields are designed for different environmental conditions and material compatibility. Car weather stripping forms a seal around doors, windows, and trunks to prevent water and air intrusion, but RV roofs experience far greater thermal expansion, UV exposure, and structural flex. These seals are not engineered for the expansive, flat surfaces and diverse materials (like rubber membranes) found on RV roofs. Using them can lead to poor adhesion, premature failure, and potential damage to your RV roof.
Always choose sealants specifically formulated for RV roofs and compatible with your roof material.
How many tubes of sealant do I need for my RV?
This depends on the length of the areas you need to seal. On average, one 10.3-ounce tube of RV roof sealant will cover just under 25 feet of RV roof edge, assuming a quarter-inch bead width and depth.
To estimate for your RV:
- Measure the perimeter of your RV roof (length + width) x 2.
- Add the perimeters of all roof-mounted accessories (vents, skylights, AC units, etc.).
- Divide the total linear feet by 25 to get an approximate number of tubes needed.
For example, a 30-foot RV that’s 8 feet wide has 76 feet of roof edge (30+8+30+8). This would require a minimum of four 10.3-ounce tubes (76 / 25 = 3.04). It’s always a good idea to buy an extra tube or two, just in case.
What is the difference between self-leveling and non-sag sealant?
This distinction is crucial for proper application and preventing leaks.
- Self-Leveling Sealant: This type of sealant is designed for horizontal surfaces. Once applied, it has a liquid-like consistency that allows it to flow and spread slightly, filling gaps and creating a smooth, level finish without needing to be tooled or smoothed. This makes it ideal for sealing around roof vents, skylights, air conditioners, and other penetrations on the flat surface of your RV roof. Dicor Self-Leveling Lap Sealant is a prime example.
- Non-Sag (or Non-Leveling) Sealant: In contrast, non-sag sealant has a thicker, more paste-like consistency. It’s designed for vertical surfaces or sloped areas where you don’t want the sealant to run or drip. This is perfect for sealing the edges of your roof where it meets the sidewalls, or around windows and other vertical seams. Geocel ProFlex RV Sealant is a popular non-sag option.
Using the wrong type can lead to a messy application and an ineffective seal. Always use self-leveling for horizontal areas and non-sag for vertical applications.
Conclusion
Maintaining your RV roof seal is one of the most important tasks you can undertake as an RV owner. It’s not just about aesthetics; it’s about safeguarding your investment from the destructive power of water. From understanding your roof material and recognizing the subtle signs of damage to choosing the right sealant and applying it correctly, every step contributes to a durable, waterproof, and UV-protected RV.
Proactive maintenance is key. Regular inspections, timely resealing, and using high-quality, material-compatible products will save you significant time, money, and stress in the long run. Don’t let a small crack turn into a major headache.
And for those unexpected RV issues on the road, whether it’s an electrical problem, a flat tire, or any other roadside emergency, Road Rescue Network is here to help. Our network of local rescuers provides fast, 24/7 service with no memberships or hidden fees, instantly connecting you with the assistance you need to get back on your adventure. When you need help with your RV, you can always find mobile RV repair services through us. Safe travels!